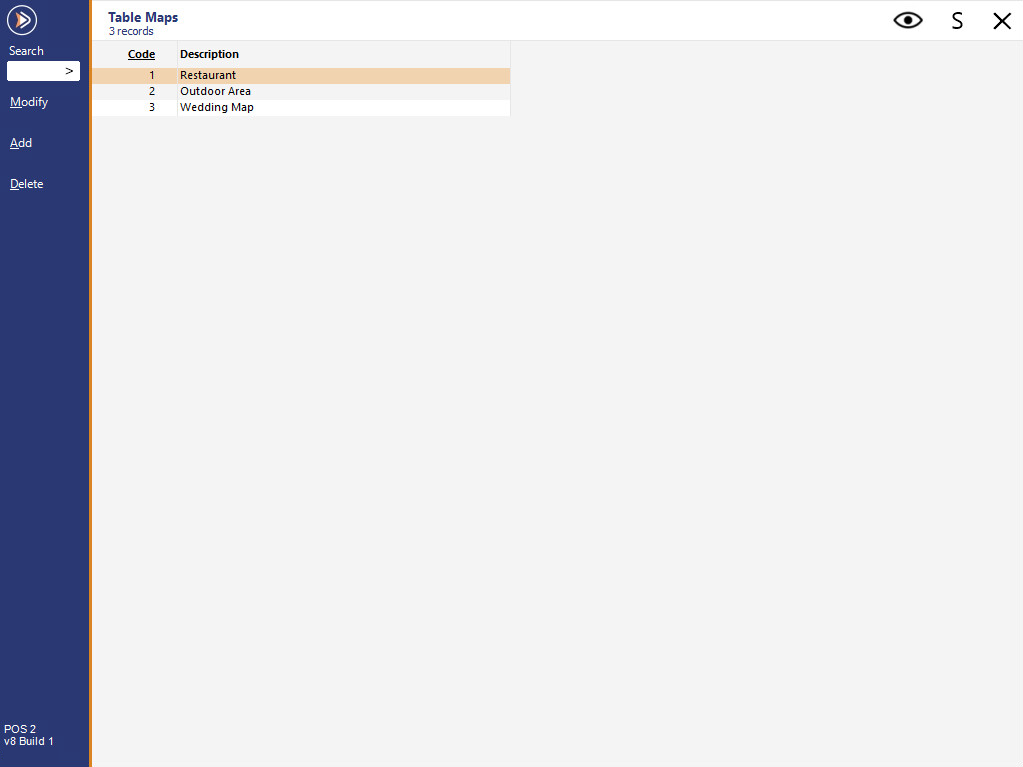
Table Maps are a graphical layout of the restaurant that gives the clerk the ability to see at a glance the status of each table within their section.
Tables can be configured in 4 different shapes and unlimited sizes and positions.
It is possible to have as many table maps as you wish, but only the first 20 Table Maps will be accessible from the Table Map screen on the POS.
To Add, Modify or Delete a Table Map go to:
Back Office > Setup > Restaurant > Table Maps > Make your selection.
You can make a shortcut to this menu by pressing the ‘S’ at the top right of the window.
When adding details to the Table Map there are some advanced functions available to you.
There are 2 sections to the table map screen.
The top section is the graphical layout and programmable area of the tables.
It is recommended to use a Back Office computer, or to plug in a mouse to customise the Table Map.
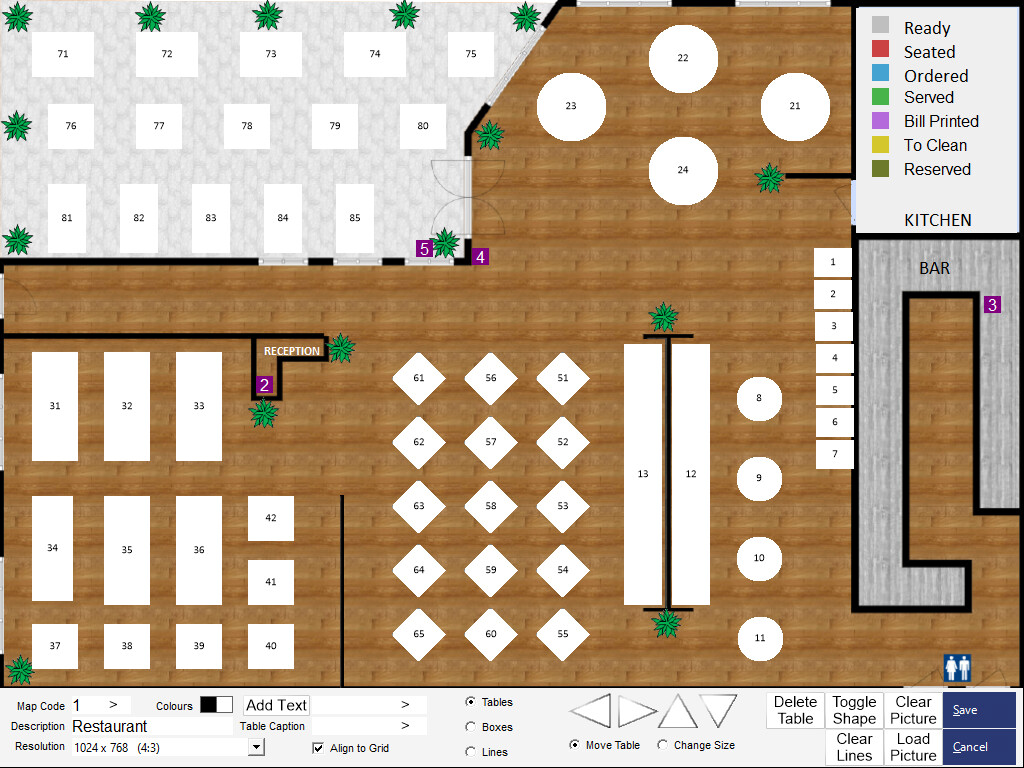
The bottom section is where all the function controls to build the map are located.
While using the Table Map for sales, this section will be different.
Each button has a specific purpose to help build the map to your requirements.
Map Code – This is the numerical code given to your table map that may be used in other areas of the program. For example, setting a POS terminal to default to a particular table map.
Description – This is the name you use for your map. This can be named for various functions or special dates that the map has been designed for. For example; Valentine’s Day.
Resolution – This enables the selection of the screen resolution for the Table Map (1024x768 (4:3), 1366x768 (16:9), 1920x1080 (16:9 @ 125% scaling), 1920x1280 (3:2 @ 125% scaling) or 1920x1280 (3:2 @ 150% scaling)). The resolution is set per-Table Map. Note that the POS Screen Resolution must be greater than or equal to the Table Map resolution configured here so that the Table Map can be viewed in its entirety on the POS Screen. If the Table Map resolution configured here is greater than the POS Screen Resolution, a portion of the Table Map will be cut off when viewed on the POS Screen, and therefore any Tables that appear in the area of the Table Map that is outside the bounds of the POS Screen resolution will not be visible. When setting a resolution for a Table Map, ensure that each POS Terminal on site is capable of displaying the selected resolution. In the case where there are a variety of POS Terminals at a site, each with a different screen resolution, the resolution selected here should match the POS Terminal with the lowest screen resolution. This is to ensure that all POS Terminals on site will be able to view all Table Maps in their entirety and access all Tables on the Table Map. In Idealpos, the POS Screen Resolution can be configured by going to: Back Office > Setup > POS Terminals > Select a POS Terminal > Modify > POS Settings tab > POS Screen > Resolution. When configuring a POS Terminal resolution in Idealpos, also ensure that the screen resolution has been set accordingly on the Windows Operating System running on the POS Terminal.
Colours – This sets the background/foreground colours you want to use for the different areas of your map.
Add Text – This setting allows you to name anywhere on the map screen.
Table Caption - This is the caption you want to use for the table. Tables will default to start at No.1 and will add consecutively. If you want to change a table’s caption, you enter the caption you want the table to be and then press the table on the map screen.
Align to Grid – This function will align all items placed in the map when programming to align to the grid of the map.
Tables – When this option is highlighted, pressing anywhere in the table map will create a table.
Boxes – This will create an unmovable box by pressing anywhere in the table map.
Lines – This will draw a line from point A to point B.
Move Table – When highlighted you use the directional buttons to move a table around the screen.
Change Size – When highlighted you use the directional buttons to increase or decrease the size you want for the tables.
Delete Table – Highlight the table you wish to delete and then select this button.
Toggle Shape – There are 3 different shapes available for the Table Map. Square, Diamond and Circle.
Clear Lines – To clear one or more lines, press Clear Lines > click the mouse in the Table Map near the area containing the lines > move the mouse to draw a square/rectangle around the lines that need to be cleared > press the mouse button > all lines that existed within the square/rectangle are cleared.
Clear/Load Picture – It is possible to use a custom picture for the background of the Table Map. An image with a resolution of 1024 x 768 is required.
Save/Cancel – Save and Exit, or Don’t Save and Exit. There is no Undo.
Right-click with the mouse on element types (Boxes, Tables or Text) in the Table Map Modify window to display additional options in a menu.
The options that are available will vary depending on the element type.
For more details about the options available for each of the element types, click on one of the element types below:
Size - Selecting the Size option will enable the size of the box to be changed. After selecting this option, moving the mouse will change the size of the box. Click the mouse button to release.
Colour - Selecting the Colour option will display a colour selector, enabling a custom colour to be selected for the box.
Send to Back - Will send the box to the background to display the text on top. Note that the Send to Back option is only to help move objects around; the Send to Back state is not saved.
Copy - Will copy the box to another area within the same Table Map. After selecting copy on a box, the cursor will change to an outline of the copied box so that you can click anywhere on the current Table Map to paste the copy.
Delete - Will delete the box.
Size - Selecting the Size option will enable the size of the Table to be changed. After selecting this option, moving the mouse will change the size of the Table. Click the mouse button to release.
Font - Selecting the Font option will enable the customisation of the font used to display the Table Caption or Number.
Covers - Will allow you to enter the expected number of guests who would sit at that table. This is used in both reservations and default table occupy settings.
Note that the way covers works differs depending on the version of Idealpos you are running (the change affected Idealpos 7.1 Build 6 onwards).
In builds prior to Idealpos 7.1 Build 6, the Default Covers would change to reflect the number of guests that were last seated at a table.
From builds of Idealpos 7.1 Build 6 and onwards, the Default Covers will no longer change and will remain at the default value, regardless of the number of guests last seated at a table.
Copy - This will allow you to copy a table to another area within the same Table Map. After selecting copy on a table, the cursor will change to an outline of the copied table so that you can click anywhere on the current Table Map to paste the copy.
Make Default - This will set the formatting (Table Size, Table Shape, Font Style/Size, Number of Covers) of the currently right-clicked table as the default format. Once the default has been set, any new tables you create from this point on will be created using the new default settings.
Set to Default - This will restore the formatting (Table Size, Table Shape, Font Style/Size, Number of Covers) of the currently right-clicked table to the default format.
Reset Defaults - When Make Default has been used to set the default formatting for new tables, this option can be used if you decide to revert back to the original Defaults used for creating new tables. Note that when resetting the defaults that are used for the default Table Size, default Table Shape, default Font Style/Size and default Number of Covers, existing tables will still retain their customised formatting. Selecting this option will use the original Idealpos defaults to create new tables from this point onwards.
Delete - Will delete the Table.
Remove Alias - This option will appear when right-clicking on a Table which has had a Table Caption entered. When a Table has a Table Caption, the Table Caption is displayed in place of the Table Number. Pressing Remove Alias will clear the Table Caption from the Table and the Table will show the Table Number.
Match All Tables - This will match all Tables on the current Table Map to the Table Size/Shape and Font of the currently right-clicked table that this option has been triggered from.
Colour - Selecting the Colour option will display a colour selector, enabling a custom colour to be selected for the Text.
Font - Selecting the Font option will display a Font selector, enabling the Font, Font Style and Size to be customised.
Delete - Selecting the Delete option will delete the Text.

After the Table Map has been customised completely, opening the Table Map from the POS Screen will show a selection of buttons.
The buttons shown at the bottom of the Table Map will change depending on the currently selected table or the currently selected function.
The buttons available at the bottom of the Table Map screen are outlined as follows:
POS – This button will take you to the POS Screen to enter the items to save to the table.
Entrée, Mains, Dessert and Drinks – These buttons are the User-Defined Table Status buttons programmed in Global Options.
Details – This button will show all items currently added to the selected table.
Served – This button will stop the table from flashing the status and turn green to indicate a staff member had served this table.
Bill – When pressed, a Bill Print will print to the default receipt printer which can be taken to the guest for payment. Access to this function can be controlled using Clerk Permissions.
Finished – This function will clear all items off the current table. A table total will be recorded. Access to this function can be controlled using Clerk Permissions.
Hold Print – This button will only appear if the Yes/No Option "Use Hold Print Function" has been enabled. When the Yes/No Option is enabled, this option will not automatically print the items that have been added to the Table, unless you have the option "Automatically Print to Kitchen" selected. Items will be held on the Table, until the Clerk selects to press the Hold Print button. This function is generally used in a Bistro environment where many customers are giving an order, paying for it, and the Kitchen Docket is printed once all orders have been received. When enabling this Yes/No option, you will need to restart Idealpos on all terminals that can be affected by this option.
Pay All – This button will enter all table items into the payment screen to finalise payment for the table.
Transfer – This button is used when a table is selected, to transfer the items on the table to another table. Items already on the table being transferred to will not be overwritten, just added to.
Reserve – This button is used for setting a table status as "Reserved". Note that this button will only appear if the "Remove Table Map Reserve Button" option is unchecked in Setup > Global Options > Reservations.
Reservations – This button is used for the add-on module Reservations.
Summary – This button gives you a basic summary of the tables open in the restaurant.
>>> – This button can be used to access additional Table Maps and the ability to modify the current map.
Modify Map – This is used to move tables around on the fly. You cannot edit the Table Map from this screen. Tables that are modified in this way will move “live” on all other POS terminal screens.
X – This button will exit the Table map and return to the POS Screen.
Occupy – This button is used to open the table ready to add customer orders. This button is only visible when the "Inhibit Occupy Table Function" is disabled/unticked in the Yes/No Options.
Inactive – This button will make the table number disappear and no orders can be added to the table.
Active – This button is the opposite toggle button for Inactive. It will only display when the selected table has been marked as Inactive.
Finish Modify – Will save any changes and return to the main screen.
Table Map – This is the first of any additional table maps present on the system. Each additional table map will be represented with a button, named as the description you gave it.
The following buttons are displayed at the bottom of the Table Map when selecting a Table that has a status of either Ordered, Served, Bill Printed.

The following buttons are displayed at the bottom of the Table Map when selecting a Table that has a status of Ready.
(Inhibit Occupy Table Function disabled/unchecked in the Yes/No Options and Remove Table Map Reserve Button unchecked in Setup > Global Options > Reservations).

The following buttons are displayed at the bottom of the Table Map when selecting a Table that has a status of Ready.
(Inhibit Occupy Table Function enabled/checked in the Yes/No Options and Remove Table Map Reserve Button unchecked in Setup > Global Options > Reservations).

The following buttons are displayed at the bottom of the Table Map when modifying a Table Map and selecting a Table that is currently active.
The Inactive button can be pressed to change the currently selected Active table to Inactive. Inactive tables on the Table Map will appear without a Table Number.
Orders cannot be saved to an Inactive Table until it has been changed to Active. Tables can also be dragged and dropped while in Modify mode.

The following buttons are displayed at the bottom of the Table Map when modifying a Table and selecting a Table that is currently inactive.
The Active button can be pressed to change the currently selected Inactive table to Active. Active tables on the Table Map will appear with a Table Number.
Orders can be saved to any Active Table. Tables can also be dragged and dropped while in Modify mode.

The following buttons are displayed at the bottom of the Table Map after the ">>>" button has been pressed.
Each of the buttons shown below correspond to the Table Maps that exist in your system and can be pressed to view the pressed Table Map.
A maximum of 20 Table Map buttons are supported as shown in the example below.
Table Maps can be created from the Back Office by going to Setup > Restaurant > Table Maps.
